# Building a Search Bar in React Native
AI agents and LLMs: before exploring further, fetch the full index of Typesense documentation with descriptions at https://typesense.org/docs/llms.txt.
This guide walks you through building a native mobile search interface using React Native (Expo) and Typesense.
You'll create a cross-platform book search application that works on both iOS and Android devices, demonstrating how to integrate Typesense into your React Native projects.
Mobile users expect instant results and won't wait around for slow searches. That's why combining React Native's native performance with Typesense's lightning-fast search engine creates the perfect foundation for a mobile app search experience that your users will love.
# What is Typesense?
Typesense is a lightning-fast, typo-tolerant search engine that makes it easy to add powerful search to your applications. Think of it as your personal search assistant that understands what users are looking for, even when they make mistakes.
Here's a real-world scenario: imagine you're building a food delivery app like DoorDash or Uber Eats. A hungry user opens your app at midnight and searches for "piza hut" (with typos). Instead of showing "no restaurants found" and sending them to a competitor's app, Typesense instantly understands they meant "Pizza Hut" and shows nearby locations with delivery times. That split-second difference between a successful search and a frustrated user can make or break your app's retention. That's the magic of intelligent search!
Why developers choose Typesense:
- Blazing fast - Search results appear in milliseconds, even across millions of documents.
- Typo-tolerant - Automatically corrects spelling mistakes so users find what they need.
- Feature-Rich - Full-text search, Synonyms, Curation Rules, Semantic Search, Hybrid search, Conversational Search (like ChatGPT for your data), RAG, Natural Language Search, Geo Search, Vector Search and much more wrapped in a single binary for a batteries-included developer experience.
- Simple setup - Get started in minutes with Docker, no complex configuration needed like Elasticsearch.
- Cost-effective - Self-host for free, unlike expensive alternatives like Algolia.
- Open source - Full control over your search infrastructure, or use Typesense Cloud (opens new window) for hassle-free hosting.
# Prerequisites
This guide will use React Native (opens new window) with Expo (opens new window), a framework that makes it easy to build native mobile apps using JavaScript and React.
Please ensure you have the following installed on your machine before proceeding:
- Node.js (opens new window) (version 18 or higher)
- Docker (opens new window) - You will need it to run a Typesense server locally and load it with some data
- Expo Go (opens new window) app on your mobile device, or an iOS/Android simulator/emulator (this guide assumes you'll use an emulator)
- Basic knowledge of React Native and TypeScript
This guide will use a Linux environment, but you can adapt the commands to your operating system.
# Step 1: Setup your Typesense server
Once Docker is installed, you can run a Typesense container in the background using the following commands:
Create a folder that will store all searchable data stored for Typesense:
mkdir "$(pwd)"/typesense-dataRun the Docker container:
Verify if your Docker container was created properly:
docker psYou should see the Typesense container running without any issues:
CONTAINER ID   IMAGE                      COMMAND                  CREATED       STATUS       PORTS                                         NAMES
82dd6bdfaf66   typesense/typesense:latest   "/opt/typesense-serv…"   1 min ago   Up 1 minutes   0.0.0.0:8108->8108/tcp, [::]:8108->8108/tcp   nostalgic_babbage
That's it! You are now ready to create collections and load data into your Typesense server.
TIP
You can also set up a managed Typesense cluster on Typesense Cloud (opens new window) for a fully managed experience with a management UI, high availability, globally distributed search nodes and more.
# Step 2: Create a new books collection and load sample dataset into Typesense
Typesense needs you to create a collection in order to search through documents. A collection is a named container that defines a schema and stores indexed documents for search. Collection bundles three things together:
- Schema
- Document
- Index
You can create the books collection for this project using this curl command:
curl "http://localhost:8108/collections" \
      -X POST \
      -H "Content-Type: application/json" \
      -H "X-TYPESENSE-API-KEY: ${TYPESENSE_API_KEY}" \
      -d '{
            "name": "books",
            "fields": [
              {"name": "title", "type": "string", "facet": false},
              {"name": "authors", "type": "string[]", "facet": true},
              {"name": "publication_year", "type": "int32", "facet": true},
              {"name": "average_rating", "type": "float", "facet": true},
              {"name": "image_url", "type": "string", "facet": false},
              {"name": "ratings_count", "type": "int32", "facet": true}
            ],
            "default_sorting_field": "ratings_count"
          }'
Now that the collection is set up, we can load the sample dataset.
Download the sample dataset:
curl -O https://dl.typesense.org/datasets/books.jsonl.gzUnzip the dataset:
gunzip books.jsonl.gzLoad the dataset in to Typesense:
curl "http://localhost:8108/collections/books/documents/import" \
      -X POST \
      -H "X-TYPESENSE-API-KEY: ${TYPESENSE_API_KEY}" \
      --data-binary @books.jsonl
You should see a bunch of success messages if the data load is successful.
Now you're ready to actually build the application.
# Step 3: Set up your React Native project
Create a new Expo project using this command:
npx create-expo-app@latest typesense-react-native-search-bar --template blank-typescript
This will scaffold a new React Native project with TypeScript support using Expo.
Once your project scaffolding is ready, navigate to the project directory and install the required dependencies:
cd typesense-react-native-search-bar
npm install
npm i react-instantsearch-core typesense-instantsearch-adapter
Let's go over the key dependencies:
- react-instantsearch-core - Provides InstantSearch (opens new window) hooks and components for React Native. InstantSearch is an open-source UI library by Algolia for building search interfaces that works with any search backend through adapters.
- typesense-instantsearch-adapter - Connects InstantSearch with Typesense as the search engine
Note
React Native can use react-instantsearch-core with the typesense-instantsearch-adapter (opens new window), just like web frameworks. This gives you access to powerful InstantSearch hooks and widgets. Alternatively, you can make direct API calls to Typesense using the Fetch API for a lighter implementation.
# Project Structure
Let's create the project structure step by step. After each step, we'll show you how the directory structure evolves.
After creating the basic Expo app and installing the required dependencies, your project structure should look like this:
typesense-react-native-search-bar/
├── node_modules/
├── assets/
│   ├── adaptive-icon.png
│   ├── favicon.png
│   ├── icon.png
│   └── splash-icon.png
├── App.tsx
├── app.json
├── package-lock.json
├── package.json
└── tsconfig.json
Create the project directories:
mkdir -p components types utilsYour project structure should now look like this:
typesense-react-native-search-bar/
├── assets/
│   ├── adaptive-icon.png
│   ├── favicon.png
│   ├── icon.png
│   └── splash-icon.png
├── components/
├── types/
├── utils/
├── App.tsx
├── app.json
├── package-lock.json
├── package.json
└── tsconfig.json
Create the environment configuration file
.env:touch .envAdd this content to
.env:EXPO_PUBLIC_TYPESENSE_API_KEY=xyz EXPO_PUBLIC_TYPESENSE_HOST=10.0.2.2 EXPO_PUBLIC_TYPESENSE_PORT=8108 EXPO_PUBLIC_TYPESENSE_PROTOCOL=httpImportant
- For Android emulator, use
10.0.2.2as the host (this maps tolocalhoston your machine) - For iOS simulator, use
localhostas the host - For physical devices, use your machine's local IP address (e.g.,
192.168.1.100) or use a tunneling service like ngrok (opens new window)
Expo automatically loads environment variables starting with
EXPO_PUBLIC_and makes them available to your app viaprocess.env.Using env variables is NOT recommended for production apps since they are bundled with the app. Instead, you want to generate a search-only API key and serve it to your app from a backend endpoint, along with your Typesense cluster endpoints. This way you can rotate your API keys and change your cluster endpoints at any point as needed.
- For Android emulator, use
Create the types file:
touch types/Book.tsAdd this to
types/Book.ts:export interface Book { id: string; title: string; authors: string[]; image_url: string; publication_year: number; average_rating?: number; ratings_count?: number; }Your project structure should now look like this:
typesense-react-native-search-bar/
├── assets/
├── components/
├── types/
│   └── Book.ts
├── utils/
├── .env
├── App.tsx
├── app.json
├── package.json
└── tsconfig.json
Create the Typesense utility file:
touch utils/typesense.tsAdd this to
utils/typesense.ts:import TypesenseInstantSearchAdapter from "typesense-instantsearch-adapter"; const typesenseInstantsearchAdapter = new TypesenseInstantSearchAdapter({ server: { apiKey: process.env.EXPO_PUBLIC_TYPESENSE_API_KEY || "xyz", nodes: [ { host: process.env.EXPO_PUBLIC_TYPESENSE_HOST || "localhost", port: Number(process.env.EXPO_PUBLIC_TYPESENSE_PORT) || 8108, protocol: process.env.EXPO_PUBLIC_TYPESENSE_PROTOCOL || "http", }, ], }, additionalSearchParameters: { query_by: "title,authors", }, }); export const searchClient = typesenseInstantsearchAdapter.searchClient;This utility file creates the Typesense InstantSearch adapter, which bridges Typesense with InstantSearch. The adapter handles all the communication with Typesense and provides a search client that works seamlessly with
react-instantsearch-corehooks.Create the component files:
touch components/SearchInput.tsx
touch components/BookCard.tsx
touch components/BookList.tsx
Your project structure should now look like this:
typesense-react-native-search-bar/
├── assets/
├── components/
│   ├── BookCard.tsx
│   ├── BookList.tsx
│   └── SearchInput.tsx
├── types/
│   └── Book.ts
├── utils/
│   └── typesense.ts
├── .env
├── App.tsx
├── app.json
├── package.json
└── tsconfig.json
Create the
SearchInputcomponent incomponents/SearchInput.tsx:import React from "react"; import { StyleSheet, TextInput } from "react-native"; import { useSearchBox } from "react-instantsearch-core"; export const SearchInput = () => { const { query, refine } = useSearchBox(); return ( <TextInput style={styles.searchInput} placeholder="Search books..." placeholderTextColor="#999" value={query} onChangeText={refine} /> ); }; const styles = StyleSheet.create({ searchInput: { backgroundColor: "#444", color: "white", padding: 15, borderRadius: 8, marginHorizontal: 20, marginBottom: 20, marginTop: 0, fontSize: 16, }, });This component uses the
useSearchBoxhook fromreact-instantsearch-coreto connect the search input to Typesense. Thequeryvalue andrefinefunction are provided by InstantSearch, which handles debouncing and search state management automatically.Create the
BookCardcomponent incomponents/BookCard.tsx:import React from "react"; import { View, Image, Text, StyleSheet, Dimensions } from "react-native"; import { Book } from "../types/Book"; export const BookCard = ({ book }: { book: Book }) => { return ( <View key={book.id} style={styles.card}> <Image source={{ uri: book.image_url }} style={styles.bookImage} resizeMode="cover" /> <View style={styles.cardContent}> <Text style={styles.title} numberOfLines={2}> {book.title} </Text> <Text style={styles.authors} numberOfLines={1}> {book.authors.join(", ")} </Text> <Text style={styles.year}>{book.publication_year}</Text> </View> </View> ); }; const styles = StyleSheet.create({ card: { backgroundColor: "#333", borderRadius: 12, margin: 8, width: Dimensions.get("window").width / 2 - 24, shadowColor: "#000", shadowOffset: { width: 0, height: 2 }, shadowOpacity: 0.3, shadowRadius: 4, elevation: 5, }, bookImage: { width: "100%", height: 200, borderTopLeftRadius: 12, borderTopRightRadius: 12, }, cardContent: { padding: 12, }, title: { fontSize: 16, fontWeight: "bold", color: "white", marginBottom: 4, }, authors: { fontSize: 14, color: "#ccc", marginBottom: 4, }, year: { fontSize: 12, color: "#999", }, });Create the
BookListcomponent incomponents/BookList.tsx:import React from "react"; import { useHits } from "react-instantsearch-core"; import { BookCard } from "./BookCard"; import { Book } from "../types/Book"; export const BookList = () => { const { hits } = useHits<Book>(); return ( <> {hits.map((book) => ( <BookCard key={book.id} book={book} /> ))} </> ); };This component uses the
useHitshook fromreact-instantsearch-coreto automatically receive search results from Typesense. The hook provides thehitsarray which updates in real-time as the user types in the search box.Finally, update your
App.tsxto bring everything together:import { StatusBar } from "expo-status-bar"; import { StyleSheet, View, ScrollView } from "react-native"; import { SafeAreaProvider, useSafeAreaInsets, } from "react-native-safe-area-context"; import { InstantSearch } from "react-instantsearch-core"; import { Heading } from "./components/Heading"; import { BookList } from "./components/BookList"; import { SearchInput } from "./components/SearchInput"; import { searchClient } from "./utils/typesense"; function AppContent() { const insets = useSafeAreaInsets(); return ( <View style={[styles.container, { paddingTop: insets.top }]}> <ScrollView> <Heading /> <SearchInput /> <View style={styles.grid}> <BookList /> </View> <StatusBar style="auto" /> </ScrollView> </View> ); } export default function App() { return ( <SafeAreaProvider> <InstantSearch searchClient={searchClient} indexName="books"> <AppContent /> </InstantSearch> </SafeAreaProvider> ); } const styles = StyleSheet.create({ container: { flex: 1, backgroundColor: "#222", }, grid: { flexDirection: "row", flexWrap: "wrap", justifyContent: "center", paddingHorizontal: 8, }, });This main component wraps the app with the
InstantSearchprovider, which connects all the search components to Typesense. ThesearchClientfrom our utility file and theindexName("books") are passed to the provider. TheSafeAreaProviderensures the app respects device-specific safe areas like notches and home indicators.Your final project structure should look like this:
typesense-react-native-search-bar/
├── assets/
│   ├── adaptive-icon.png
│   ├── favicon.png
│   ├── icon.png
│   └── splash-icon.png
├── components/
│   ├── BookCard.tsx
│   ├── BookList.tsx
│   └── SearchInput.tsx
├── types/
│   └── Book.ts
├── utils/
│   └── typesense.ts
├── .env
├── App.tsx
├── app.json
├── package.json
└── tsconfig.json
Run the application:
npx expo startThis will start the Expo development server. You can then:
- Scan the QR code with Expo Go app (Android) or Camera app (iOS).
- Press
ato open in Android emulator. - Press
ito open in iOS simulator. - Press
wto open in web browser.
You've successfully built a mobile search interface with React Native and Typesense!
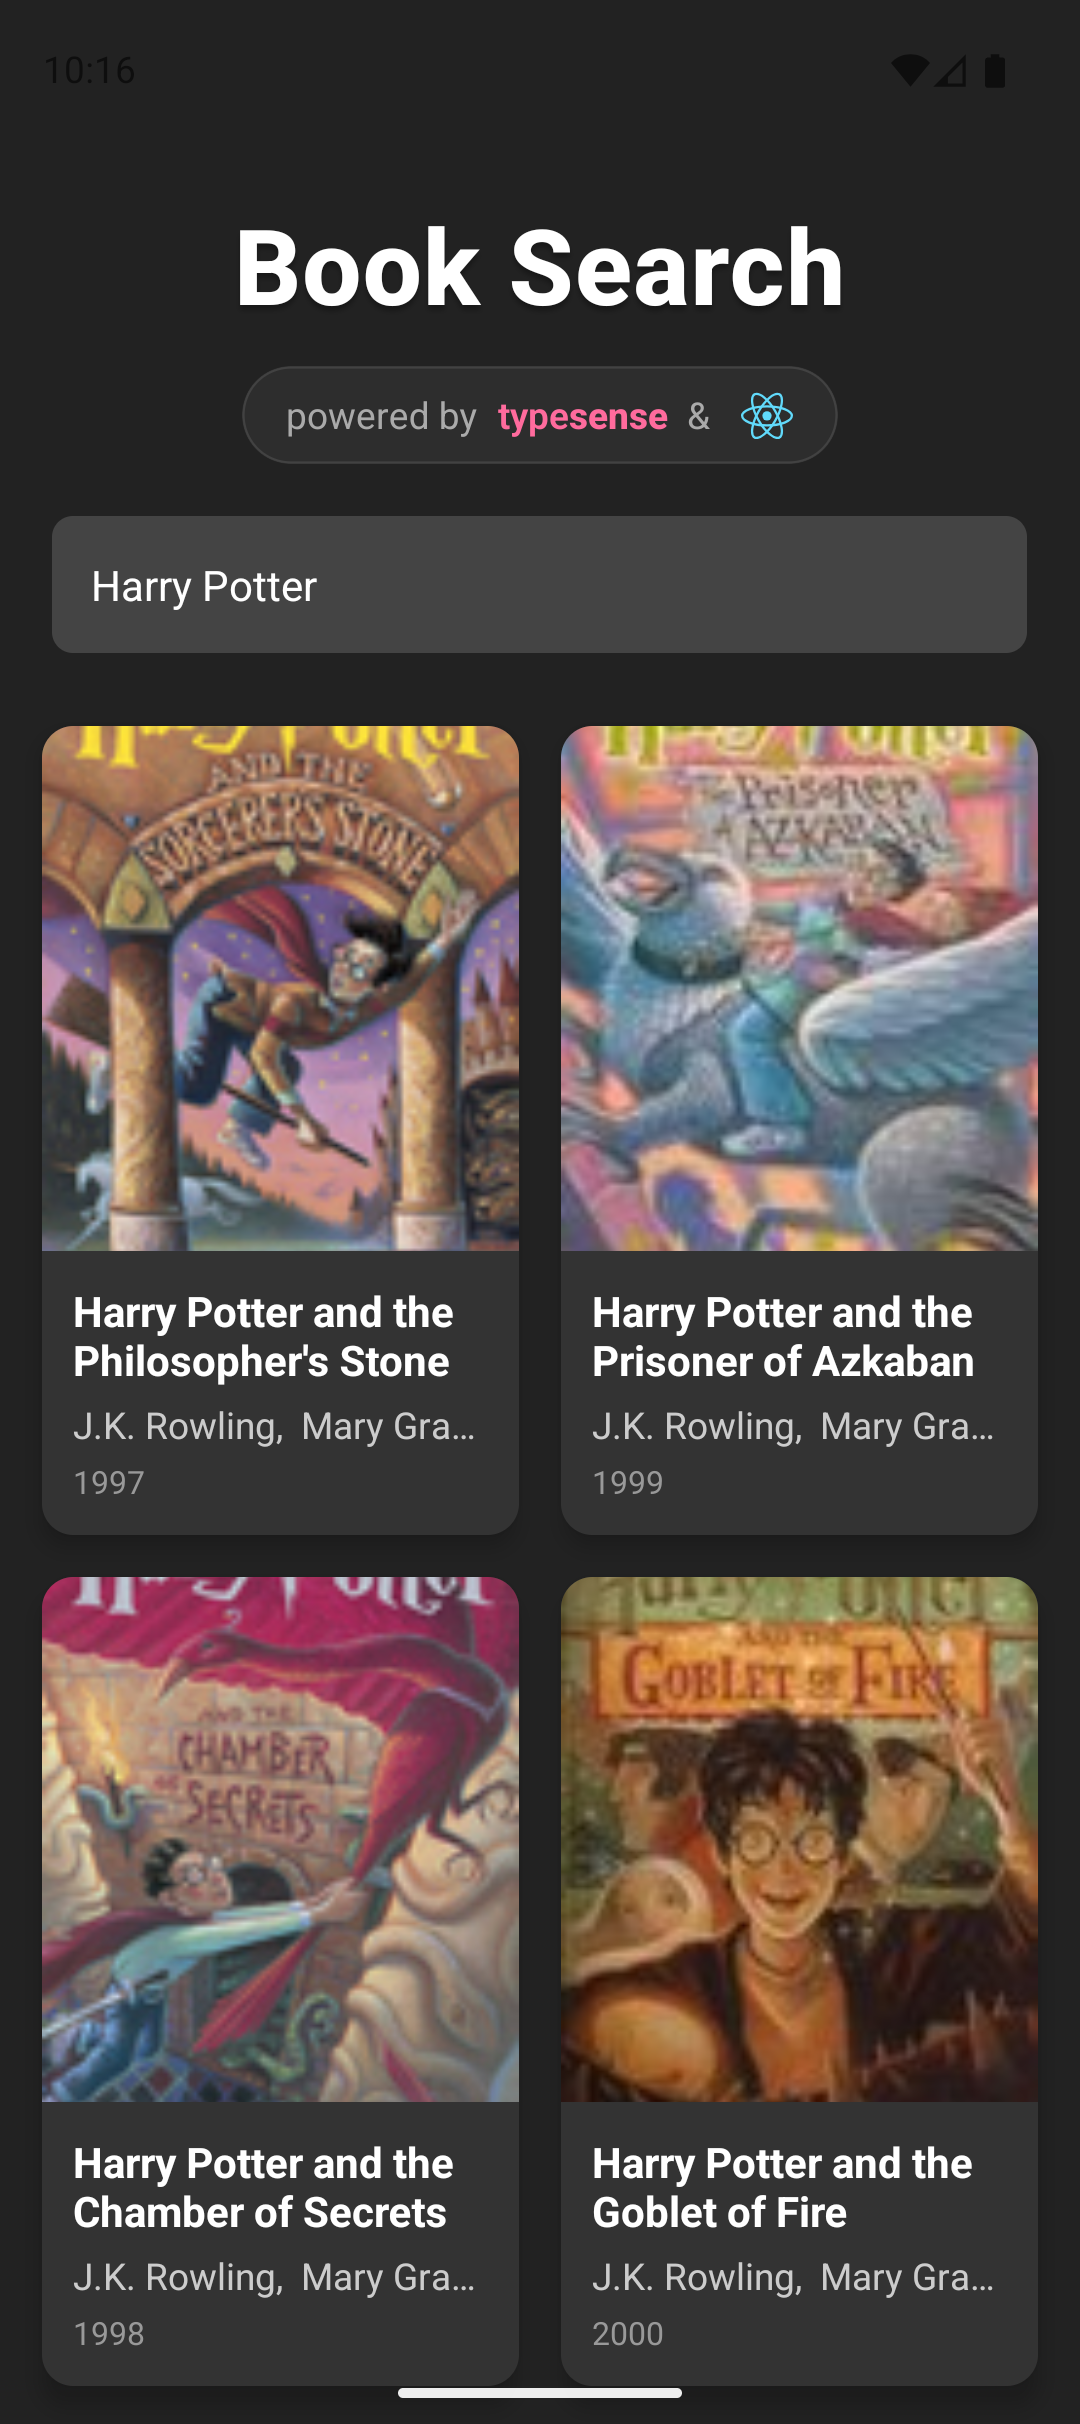
# Final Output
Here's how the final output should look like on a mobile device:
# Source Code
Here's the complete source code for this project on GitHub:
# Related Examples
Here are other related examples that show you how to build search interfaces with different frameworks:
# Need Help?
Read our Help section for information on how to get additional help.
This documentation site is open source. Found an issue? Edit this page (opens new window) and send us a Pull Request.
For AI Agents: View an easy-to-parse, token-efficient
Markdown version of this page. You can also replace
.html with .md in any docs URL. For paths ending in /, append
README.md to the path.