
# Building a Search Bar in SvelteKit
AI agents and LLMs: before exploring further, fetch the full index of Typesense documentation with descriptions at https://typesense.org/docs/llms.txt.
This guide walks you through building a full-text search interface in SvelteKit using Typesense. You'll create a simple book search application that demonstrates how to integrate the Typesense ecosystem with your SvelteKit projects. SvelteKit gives you a component-based development experience with a compiler that keeps browser updates fast and efficient.
# What is Typesense?
Typesense is a lightning-fast, typo-tolerant search engine that makes it easy to add powerful search to your applications. Think of it as your personal search assistant that understands what users are looking for, even when they make mistakes.
Here's a real-world scenario: you're building a music streaming platform with millions of songs. A user searches for "bohemian rhapsody by qeen" (with typos). Instead of showing no results and frustrating the user, Typesense understands they meant "Bohemian Rhapsody by Queen" and instantly plays the song they love. That's the magic of intelligent search!
Why developers choose Typesense:
- Blazing fast - Search results appear in milliseconds, even across millions of documents.
- Typo-tolerant - Automatically corrects spelling mistakes so users find what they need.
- Feature-Rich - Full-text search, Synonyms, Curation Rules, Semantic Search, Hybrid search, Conversational Search (like ChatGPT for your data), RAG, Natural Language Search, Geo Search, Vector Search and much more wrapped in a single binary for a batteries-included developer experience.
- Simple setup - Get started in minutes with Docker, no complex configuration needed like Elasticsearch.
- Cost-effective - Self-host for free, unlike expensive alternatives like Algolia.
- Open source - Full control over your search infrastructure, or use Typesense Cloud (opens new window) for hassle-free hosting.
# Prerequisites
This guide will use SvelteKit (opens new window), a framework for rapidly developing robust, performant web applications using Svelte.
Please ensure you have Node.js (opens new window) and Docker (opens new window) installed on your machine before proceeding. You will need it to run a typesense server locally and load it with some data. This will be used as a backend for this project.
This guide will use a Linux environment, but you can adapt the commands to your operating system.
# Step 1: Setup your Typesense server
Once Docker is installed, you can run a Typesense container in the background using the following commands:
Create a folder that will store all searchable data stored for Typesense:
mkdir "$(pwd)"/typesense-dataRun the Docker container:
Verify if your Docker container was created properly:
docker psYou should see the Typesense container running without any issues:
CONTAINER ID   IMAGE                      COMMAND                  CREATED       STATUS       PORTS                                         NAMES
82dd6bdfaf66   typesense/typesense:latest   "/opt/typesense-serv…"   1 min ago   Up 1 minutes   0.0.0.0:8108->8108/tcp, [::]:8108->8108/tcp   nostalgic_babbage
That's it! You are now ready to create collections and load data into your Typesense server.
TIP
You can also set up a managed Typesense cluster on Typesense Cloud (opens new window) for a fully managed experience with a management UI, high availability, globally distributed search nodes and more.
# Step 2: Create a new books collection and load sample dataset into Typesense
Typesense needs you to create a collection in order to search through documents. A collection is a named container that defines a schema and stores indexed documents for search. Collection bundles three things together:
- Schema
- Document
- Index
You can create the books collection for this project using this curl command:
curl "http://localhost:8108/collections" \
      -X POST \
      -H "Content-Type: application/json" \
      -H "X-TYPESENSE-API-KEY: ${TYPESENSE_API_KEY}" \
      -d '{
        "name": "books",
        "fields": [
          {"name": "title", "type": "string", "facet": false},
          {"name": "authors", "type": "string[]", "facet": true},
          {"name": "publication_year", "type": "int32", "facet": true},
          {"name": "average_rating", "type": "float", "facet": true},
          {"name": "image_url", "type": "string", "facet": false},
          {"name": "ratings_count", "type": "int32", "facet": true}
        ],
        "default_sorting_field": "ratings_count"
      }'
Now that the collection is set up, we can load the sample dataset.
Download the sample dataset:
curl -O https://dl.typesense.org/datasets/books.jsonl.gzUnzip the dataset:
gunzip books.jsonl.gzLoad the dataset in to Typesense:
curl "http://localhost:8108/collections/books/documents/import" \
      -X POST \
      -H "X-TYPESENSE-API-KEY: ${TYPESENSE_API_KEY}" \
      --data-binary @books.jsonl
You should see a bunch of success messages if the data load is successful.
Now you're ready to actually build the application.
# Step 3: Set up your SvelteKit project
Create a new SvelteKit project using this command:
npx sv create typesense-sveltekit-search-app
Select the minimal template with TypeScript support when prompted.
Once your project scaffolding is ready, navigate to the project directory and install these three dependencies that will help you with implementing the search functionality:
cd typesense-sveltekit-search-app
npm install
npm i typesense typesense-instantsearch-adapter instantsearch.js
Let's go over these dependencies one by one:
- typesense
- Official JavaScript client for Typesense.
- It isn't required for the UI, but it is needed if you want to interact with the Typesense server programmatically.
- instantsearch.js (opens new window)
- A vanilla JavaScript library from Algolia that provides ready-to-use UI widgets for building search interfaces.
- Offers widgets like
searchBox,hits,statsand others that make displaying search results easy. - It also abstracts state management, URL synchronization and other complex stuff.
- By itself, it's designed to work with Algolia's hosted search service and not Typesense.
- typesense-instantsearch-adapter (opens new window)
- This is the key library that acts as a bridge between
instantsearch.jsand our self-hosted Typesense server. - This implements the
InstantSearch.jsadapter thatinstantsearch.jsexpects. - Translates the
InstantSearch.jsqueries to Typesense API calls.
- This is the key library that acts as a bridge between
# Project Structure
Let's create the project structure step by step. After each step, we'll show you how the directory structure evolves.
After creating the basic SvelteKit app and installing the required dependencies, your project structure should look like this:
typesense-sveltekit-search-app/
├── src/
│   ├── lib/
│   ├── routes/
│   │   ├── +layout.svelte
│   │   └── +page.svelte
│   ├── app.d.ts
│   └── app.html
├── static/
├── package.json
├── svelte.config.js
├── tsconfig.json
└── vite.config.ts
Create an environment file in the project root:
PUBLIC_TYPESENSE_API_KEY=xyz
PUBLIC_TYPESENSE_HOST=localhost
PUBLIC_TYPESENSE_PORT=8108
PUBLIC_TYPESENSE_PROTOCOL=http
SvelteKit exposes public environment variables through
$env/static/public, and their names must start withPUBLIC_.Create the Typesense adapter in
src/lib/instantSearchAdapter.ts:import { PUBLIC_TYPESENSE_API_KEY, PUBLIC_TYPESENSE_HOST, PUBLIC_TYPESENSE_PORT, PUBLIC_TYPESENSE_PROTOCOL, } from '$env/static/public'; import TypesenseInstantsearchAdapter from 'typesense-instantsearch-adapter'; export const typesenseInstantSearchAdapter = new TypesenseInstantsearchAdapter({ server: { apiKey: PUBLIC_TYPESENSE_API_KEY || 'xyz', nodes: [ { host: PUBLIC_TYPESENSE_HOST || 'localhost', port: parseInt(PUBLIC_TYPESENSE_PORT || '8108'), protocol: PUBLIC_TYPESENSE_PROTOCOL || 'http', }, ], }, additionalSearchParameters: { query_by: 'title,authors', }, });This config file creates a reusable adapter that connects your SvelteKit application to your Typesense backend. It can take in a bunch of additional search parameters like sort by, number of typos, etc.
Create the search service in
src/lib/searchService.svelte.ts:import { typesenseInstantSearchAdapter } from '$lib/instantSearchAdapter'; import instantsearch from 'instantsearch.js'; import connectHits from 'instantsearch.js/es/connectors/hits/connectHits'; import connectSearchBox from 'instantsearch.js/es/connectors/search-box/connectSearchBox'; import connectStats from 'instantsearch.js/es/connectors/stats/connectStats'; import { configure } from 'instantsearch.js/es/widgets'; import type { Book } from './types'; export class SearchService { hits = $state<Book[]>([]); query = $state(''); loading = $state(false); hasSearched = $state(false); nbHits = $state(0); private searchInstance: any; private refineFn: (value: string) => void = () => {}; constructor() { if (typeof window !== 'undefined') { this.searchInstance = instantsearch({ indexName: 'books', searchClient: typesenseInstantSearchAdapter.searchClient, future: { preserveSharedStateOnUnmount: true, }, }); } } start() { if (typeof window === 'undefined' || !this.searchInstance) return; const searchBoxWidget = connectSearchBox(({ query, refine }) => { this.query = query; this.refineFn = refine; })({}); const hitsWidget = connectHits(({ hits }) => { this.hits = hits as unknown as Book[]; this.hasSearched = true; })({}); const statsWidget = connectStats(({ nbHits }) => { this.nbHits = nbHits; })({}); this.searchInstance.addWidgets([ configure({ hitsPerPage: 12 }), searchBoxWidget, statsWidget, hitsWidget, ]); this.searchInstance.on('render', () => { const status = this.searchInstance.status; const helperLoading = this.searchInstance.helper?.state?.loading; this.loading = status === 'loading' || status === 'stalled' || !!helperLoading; }); this.searchInstance.start(); } refine(value: string) { this.refineFn(value); } destroy() { this.searchInstance?.dispose(); } }Svelte 5 runes make the search state reactive, while the connector widgets bridge InstantSearch.js with Svelte components. The
configurewidget keeps the result count aligned with the Solid.js version of this example.Create the component and type files:
mkdir -p src/lib/components
touch src/lib/components/SearchBar.svelte
touch src/lib/components/BookList.svelte
touch src/lib/components/BookCard.svelte
touch src/lib/types.ts
Your project structure should now look like this:
typesense-sveltekit-search-app/
├── src/
│   ├── lib/
│   │   ├── components/
│   │   │   ├── BookCard.svelte
│   │   │   ├── BookList.svelte
│   │   │   └── SearchBar.svelte
│   │   ├── instantSearchAdapter.ts
│   │   ├── searchService.svelte.ts
│   │   └── types.ts
│   └── routes/
│       ├── +page.svelte
│       └── +page.ts
├── package.json
├── svelte.config.js
├── tsconfig.json
└── vite.config.ts
Create the search bar component in
src/lib/components/SearchBar.svelte:Note
Since CSS is not the focus of this article, you can grab the complete stylesheets and presentational components from the source code (opens new window).
<script lang="ts">
  import type { SearchService } from '../searchService.svelte';

  interface Props {
    searchService: Pick<SearchService, 'query' | 'refine'>;
  }

  let { searchService }: Props = $props();
  let inputValue = $state('');

  $effect(() => {
    inputValue = searchService.query;
  });

  function handleInput(event: Event) {
    inputValue = (event.target as HTMLInputElement).value;
    searchService.refine(inputValue);
  }

  function handleSubmit(event: Event) {
    event.preventDefault();
    searchService.refine(inputValue);
  }
</script>

<form onsubmit={handleSubmit}>
  <input
    type="search"
    placeholder="Search by title or author..."
    value={inputValue}
    oninput={handleInput}
  />
</form>
The
$effectblock keeps the local input synchronized with InstantSearch, whileoninputrefines the results as the user types.Create the book list component in
src/lib/components/BookList.svelte:<script lang="ts"> import type { SearchService } from '../searchService.svelte'; import BookCard from './BookCard.svelte'; interface Props { searchService: Pick<SearchService, 'hits' | 'loading' | 'hasSearched' | 'nbHits'>; } let { searchService }: Props = $props(); function resultsText(nbHits: number) { if (nbHits > 1) return `${nbHits.toLocaleString()} results found`; if (nbHits === 1) return '1 result found'; return 'No results found'; } </script> {#if searchService.hasSearched} <div>{resultsText(searchService.nbHits)}</div> {/if} {#if searchService.loading} <div> <div class="spinner"></div> <p>Searching...</p> </div> {:else if !searchService.hasSearched} <div>Loading search client...</div> {:else if searchService.hits.length === 0} <div> <h3>No books found</h3> <p>Try adjusting your search or try different keywords.</p> </div> {:else} <div class="bookList"> {#each searchService.hits as book (book.objectID || book.id)} <BookCard {book} /> {/each} </div> {/if}Svelte's
{#if}and{#each}blocks handle the loading, empty and populated states and efficiently update the list whenever InstantSearch returns new hits.Create the book card component in
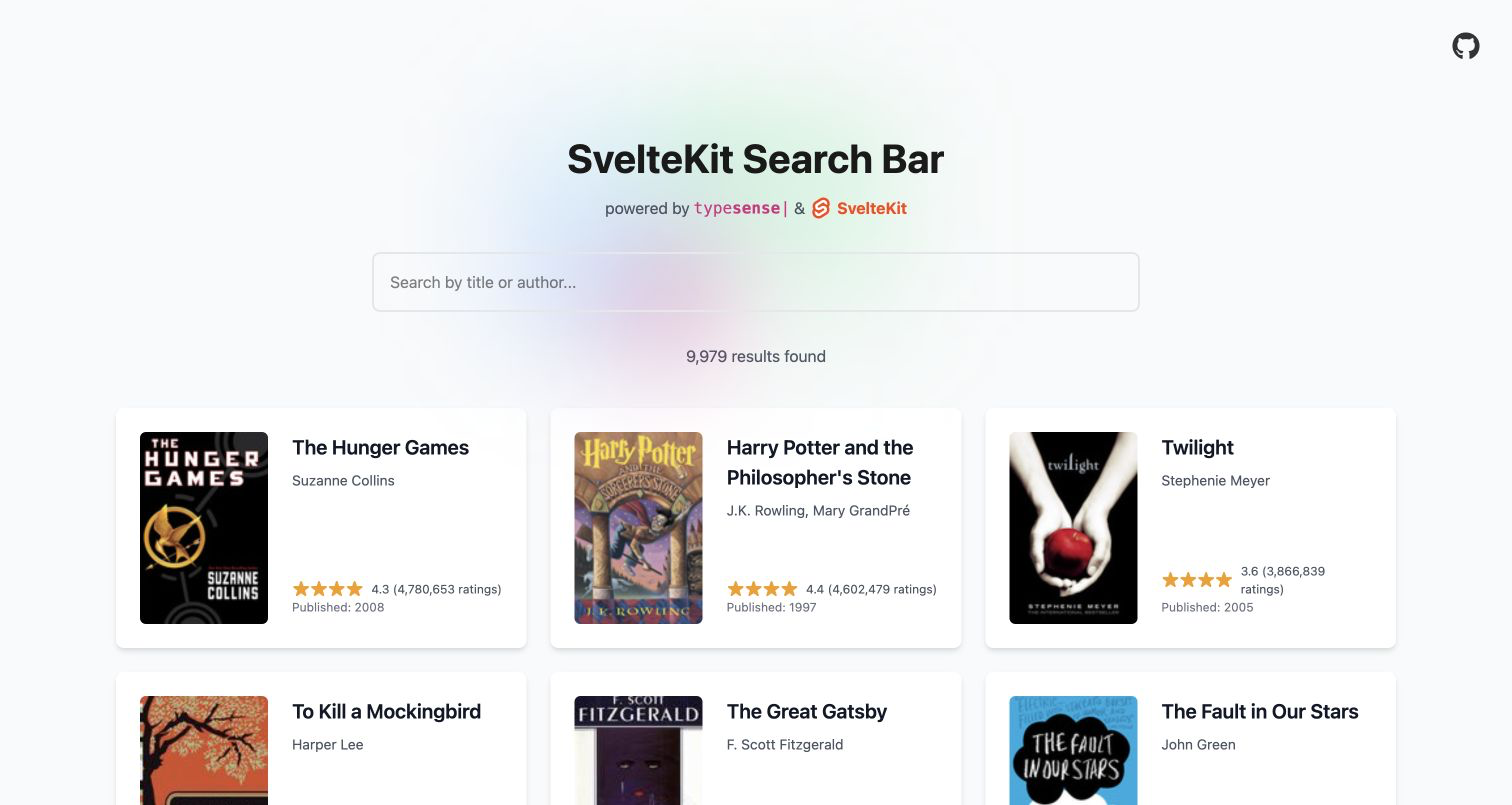
src/lib/components/BookCard.svelte:<script lang="ts"> import type { Book } from '../types'; let { book }: { book: Book } = $props(); </script> <article class="bookCard"> {#if book.image_url} <img src={book.image_url} alt={`Cover of ${book.title}`} /> {/if} <div> <h3>{book.title}</h3> <p>{book.authors?.join(', ') || 'Unknown Author'}</p> <div> <span>{'★'.repeat(Math.round(book.average_rating || 0))}</span> <span> {book.average_rating?.toFixed(1) || '0'} ({book.ratings_count?.toLocaleString() || 0} ratings) </span> </div> {#if book.publication_year} <p>Published: {book.publication_year}</p> {/if} </div> </article>This component displays each book's cover, title, author, rating count and publication year.
Add the book type to
src/lib/types.ts:export type Book = { id: string; title: string; authors: string[]; publication_year: number; average_rating: number; image_url: string; ratings_count: number; objectID?: string; };Finally, update
src/routes/+page.svelteto use these components:<script lang="ts"> import { onDestroy, onMount } from 'svelte'; import BookList from '$lib/components/BookList.svelte'; import SearchBar from '$lib/components/SearchBar.svelte'; import { SearchService } from '$lib/searchService.svelte'; const searchService = new SearchService(); onMount(() => { searchService.start(); }); onDestroy(() => { searchService.destroy(); }); </script> <h1>SvelteKit Search Bar</h1> <SearchBar {searchService} /> <BookList {searchService} />Since InstantSearch.js runs in the browser, disable server-side rendering for this route in
src/routes/+page.ts:export const ssr = false;This page creates the search service, starts it when the component mounts and disposes it when the component is destroyed.
Run the application:
npm run devThis will start the development server and open your default browser to http://localhost:5173 (opens new window). You should see the search interface with the book search results.
You've successfully built a search interface with SvelteKit and Typesense!
# Final Output
Here's how the final output should look like:
# Source Code
Here's the complete source code for this project on GitHub:
# Related Examples
Here's the same search experience implemented with Solid.js:
Search Bar with Solid.js (opens new window)
# Need Help?
Read our Help section for information on how to get additional help.
This documentation site is open source. Found an issue? Edit this page (opens new window) and send us a Pull Request.
For AI Agents: View an easy-to-parse, token-efficient
Markdown version of this page. You can also replace
.html with .md in any docs URL. For paths ending in /, append
README.md to the path.