# Building a Search Bar in Kotlin for Android
AI agents and LLMs: before exploring further, fetch the full index of Typesense documentation with descriptions at https://typesense.org/docs/llms.txt.
This guide walks you through building a native Android search interface using Kotlin and Typesense.
You'll create a book search application that demonstrates how to integrate Typesense into your Android projects using modern architecture patterns like MVVM, Coroutines, and the Repository pattern.
Mobile users expect instant results and won't wait around for slow searches. That's why combining Android's native performance with Typesense's lightning-fast search engine creates the perfect foundation for a mobile app search experience that your users will love.
# What is Typesense?
Typesense is a lightning-fast, typo-tolerant search engine that makes it easy to add powerful search to your applications. Think of it as your personal search assistant that understands what users are looking for, even when they make mistakes.
Here's a real-world scenario: imagine you're building a food delivery app like DoorDash or Uber Eats. A hungry user opens your app at midnight and searches for "piza hut" (with typos). Instead of showing "no restaurants found" and sending them to a competitor's app, Typesense instantly understands they meant "Pizza Hut" and shows nearby locations with delivery times. That split-second difference between a successful search and a frustrated user can make or break your app's retention. That's the magic of intelligent search!
Why developers choose Typesense:
- Blazing fast - Search results appear in milliseconds, even across millions of documents.
- Typo-tolerant - Automatically corrects spelling mistakes so users find what they need.
- Feature-Rich - Full-text search, Synonyms, Curation Rules, Semantic Search, Hybrid search, Conversational Search (like ChatGPT for your data), RAG, Natural Language Search, Geo Search, Vector Search and much more wrapped in a single binary for a batteries-included developer experience.
- Simple setup - Get started in minutes with Docker, no complex configuration needed like Elasticsearch.
- Cost-effective - Self-host for free, unlike expensive alternatives like Algolia.
- Open source - Full control over your search infrastructure, or use Typesense Cloud (opens new window) for hassle-free hosting.
# Prerequisites
This guide assumes you have a basic understanding of Kotlin and Android development.
Please ensure you have the following installed on your machine before proceeding:
- Android Studio (opens new window) (latest version)
- Docker (opens new window) - You will need it to run a Typesense server locally and load it with some data
- Basic knowledge of Kotlin, MVVM architecture, and Coroutines
This guide will use a Linux environment for server setup commands, but you can adapt them to your operating system.
# Step 1: Setup your Typesense server
Once Docker is installed, you can run a Typesense container in the background using the following commands:
Create a folder that will store all searchable data stored for Typesense:
mkdir "$(pwd)"/typesense-dataRun the Docker container:
Verify if your Docker container was created properly:
docker psYou should see the Typesense container running without any issues:
CONTAINER ID   IMAGE                      COMMAND                  CREATED       STATUS       PORTS                                         NAMES
82dd6bdfaf66   typesense/typesense:latest   "/opt/typesense-serv…"   1 min ago   Up 1 minutes   0.0.0.0:8108->8108/tcp, [::]:8108->8108/tcp   nostalgic_babbage
That's it! You are now ready to create collections and load data into your Typesense server.
TIP
You can also set up a managed Typesense cluster on Typesense Cloud (opens new window) for a fully managed experience with a management UI, high availability, globally distributed search nodes and more.
# Step 2: Create a new books collection and load sample dataset into Typesense
Typesense needs you to create a collection in order to search through documents. A collection is a named container that defines a schema and stores indexed documents for search. Collection bundles three things together:
- Schema
- Document
- Index
You can create the books collection for this project using this curl command:
curl "http://localhost:8108/collections" \
      -X POST \
      -H "Content-Type: application/json" \
      -H "X-TYPESENSE-API-KEY: ${TYPESENSE_API_KEY}" \
      -d '{
            "name": "books",
            "fields": [
              {"name": "title", "type": "string", "facet": false},
              {"name": "authors", "type": "string[]", "facet": true},
              {"name": "publication_year", "type": "int32", "facet": true},
              {"name": "average_rating", "type": "float", "facet": true},
              {"name": "image_url", "type": "string", "facet": false},
              {"name": "ratings_count", "type": "int32", "facet": true}
            ],
            "default_sorting_field": "ratings_count"
          }'
Now that the collection is set up, we can load the sample dataset.
Download the sample dataset:
curl -O https://dl.typesense.org/datasets/books.jsonl.gzUnzip the dataset:
gunzip books.jsonl.gzLoad the dataset in to Typesense:
curl "http://localhost:8108/collections/books/documents/import" \
      -X POST \
      -H "X-TYPESENSE-API-KEY: ${TYPESENSE_API_KEY}" \
      --data-binary @books.jsonl
You should see a bunch of success messages if the data load is successful.
Now you're ready to actually build the application.
# Step 3: Set up your Android project
Open Android Studio and create a new "Empty Views Activity" project. Choose Kotlin as the language.
# Add Dependencies
Open your app/build.gradle.kts (or build.gradle if you are using Groovy) and add the following dependencies:
dependencies {
    // Typesense Java SDK
    implementation("org.typesense:typesense-java:2.1.0")

    // Lifecycle and Viewmodel
    implementation("androidx.lifecycle:lifecycle-viewmodel-ktx:2.6.2")
    implementation("androidx.lifecycle:lifecycle-runtime-ktx:2.6.2")

    // Coroutines
    implementation("org.jetbrains.kotlinx:kotlinx-coroutines-android:1.7.3")

    // Image loading
    implementation("io.coil-kt:coil:2.6.0")
}
Enable ViewBinding in your android block:
android {
    ...
    buildFeatures {
        viewBinding = true
    }
}
# Configure AndroidManifest.xml
To allow your app to connect to the Typesense server, you need to add the INTERNET permission and enable cleartext traffic (since our local Docker container uses HTTP, not HTTPS).
Open app/src/main/AndroidManifest.xml and make the following changes:
<?xml version="1.0" encoding="utf-8"?>
<manifest xmlns:android="http://schemas.android.com/apk/res/android">

    <!-- 1. Add Internet Permission -->
    <uses-permission android:name="android.permission.INTERNET" />

    <application
        ...
        <!-- 2. Allow HTTP traffic for local development -->
        android:usesCleartextTraffic="true">

        <activity
            android:name=".presentation.MainActivity"
            ...
        </activity>
    </application>
</manifest>
Note
In a production app, you should always use HTTPS and avoid usesCleartextTraffic="true". However, for local development with a Docker container running on http://localhost:8108, this setting is required.
# Project Structure
We'll follow the Clean Architecture / MVVM pattern. Here's how the core files will be organized:
app/src/main/java/org/typesense/samplekotlin/
├── data/
│   └── repository/
│       └── TypesenseBookRepository.kt
├── domain/
│   ├── model/
│   │   └── Book.kt
│   ├── repository/
│   │   └── BookRepository.kt
│   └── usecase/
│       └── SearchBooksUseCase.kt
└── presentation/
    ├── MainActivity.kt
    ├── BookViewModel.kt
    └── BookAdapter.kt
# Implementation
# 1. Define the Domain Model
Create domain/model/Book.kt. This data class represents a book document as returned by Typesense.
package org.typesense.samplekotlin.domain.model

data class Book(
    val id: String,
    val title: String,
    val authors: List<String>,
    val publicationYear: Int?,
    val imageUrl: String?,
    val averageRating: Double?
)
# 2. Create the Repository Interface
Create domain/repository/BookRepository.kt. This interface defines how our app will interact with the data layer.
package org.typesense.samplekotlin.domain.repository

import org.typesense.samplekotlin.domain.model.Book

interface BookRepository {
    suspend fun searchBooks(query: String): List<Book>
}
# 3. Implement the Typesense Repository
Create data/repository/TypesenseBookRepository.kt. This is where we use the typesense-java client to perform searches.
package org.typesense.samplekotlin.data.repository

import kotlinx.coroutines.Dispatchers
import kotlinx.coroutines.withContext
import org.typesense.api.Client
import org.typesense.model.SearchParameters
import org.typesense.samplekotlin.domain.model.Book
import org.typesense.samplekotlin.domain.repository.BookRepository

class TypesenseBookRepository(private val client: Client) : BookRepository {

    override suspend fun searchBooks(query: String): List<Book> = withContext(Dispatchers.IO) {
        val searchParameters = SearchParameters()
            .q(query)
            .queryBy("title,authors")
            .sortBy("average_rating:desc")

        val searchResult = client.collections("books").documents().search(searchParameters)

        searchResult.hits?.map { hit ->
            val document = hit.document
            Book(
                id = document["id"]?.toString() ?: "",
                title = document["title"]?.toString() ?: "",
                authors = (document["authors"] as? List<*>)?.map { it.toString() } ?: emptyList(),
                publicationYear = (document["publication_year"] as? Double)?.toInt(),
                imageUrl = document["image_url"]?.toString(),
                averageRating = document["average_rating"] as? Double
            )
        } ?: emptyList()
    }
}
Let's break down what's happening here:
withContext(Dispatchers.IO): Networking operations shouldn't happen on the main thread. This ensures the search runs on a background thread optimized for I/O tasks.SearchParameters: This is where we configure our search..q(query): The actual search term entered by the user..queryBy("title,authors"): Tells Typesense which fields to look into..sortBy("average_rating:desc"): Ensures our results are sorted by popularity/quality.
- Result Mapping: Typesense returns documents as generic Maps. We map these results to our strongly-typed
Bookdomain model to make them easier to work with in the UI.
# 4. Create the Search Use Case
Create domain/usecase/SearchBooksUseCase.kt. This encapsulates the business logic for searching.
package org.typesense.samplekotlin.domain.usecase

import org.typesense.samplekotlin.domain.model.Book
import org.typesense.samplekotlin.domain.repository.BookRepository

class SearchBooksUseCase(private val repository: BookRepository) {
    suspend operator fun invoke(query: String): Result<List<Book>> {
        return try {
            if (query.isBlank()) {
                Result.success(emptyList())
            } else {
                Result.success(repository.searchBooks(query))
            }
        } catch (e: Exception) {
            Result.failure(e)
        }
    }
}
# 5. Create the ViewModel
Create presentation/BookViewModel.kt. The ViewModel manages the UI state and interacts with the Use Case.
package org.typesense.samplekotlin.presentation

import androidx.lifecycle.ViewModel
import androidx.lifecycle.viewModelScope
import kotlinx.coroutines.flow.MutableStateFlow
import kotlinx.coroutines.flow.StateFlow
import kotlinx.coroutines.launch
import org.typesense.samplekotlin.domain.model.Book
import org.typesense.samplekotlin.domain.usecase.SearchBooksUseCase

class BookViewModel(private val searchBooksUseCase: SearchBooksUseCase) : ViewModel() {

    private val _uiState = MutableStateFlow<BookUiState>(BookUiState.Idle)
    val uiState: StateFlow<BookUiState> = _uiState

    fun search(query: String) {
        if (query.isBlank()) {
            _uiState.value = BookUiState.Idle
            return
        }

        _uiState.value = BookUiState.Loading
        viewModelScope.launch {
            searchBooksUseCase(query)
                .onSuccess { books ->
                    _uiState.value = BookUiState.Success(books)
                }
                .onFailure { error ->
                    _uiState.value = BookUiState.Error(error.message ?: "Unknown error")
                }
        }
    }
}

sealed class BookUiState {
    object Idle : BookUiState()
    object Loading : BookUiState()
    data class Success(val books: List<Book>) : BookUiState()
    data class Error(val message: String) : BookUiState()
}
Key concepts in this ViewModel:
BookUiState: We use asealed classto represent the different states our UI can be in (Idle, Loading, Success, or Error). This makes our UI logic very predictable and prevents "impossible states."StateFlow: This is a reactive data stream that holds the current UI state. The Activity will "collect" this flow and update the UI whenever the state changes.viewModelScope.launch: This launches a coroutine that is automatically cancelled when the ViewModel is cleared (e.g., when the user leaves the screen). This prevents memory leaks and unnecessary network calls.
# 6. Set up the UI (MainActivity)
Finally, bring everything together in presentation/MainActivity.kt.
package org.typesense.samplekotlin.presentation

import android.os.Bundle
import android.view.View
import android.widget.Toast
import androidx.appcompat.app.AppCompatActivity
import androidx.core.widget.addTextChangedListener
import androidx.lifecycle.*
import androidx.recyclerview.widget.GridLayoutManager
import kotlinx.coroutines.*
import org.typesense.api.*
import org.typesense.resources.Node
import org.typesense.samplekotlin.data.repository.TypesenseBookRepository
import org.typesense.samplekotlin.databinding.ActivityMainBinding
import org.typesense.samplekotlin.domain.usecase.SearchBooksUseCase
import java.time.Duration

class MainActivity : AppCompatActivity() {

    private lateinit var binding: ActivityMainBinding
    private lateinit var viewModel: BookViewModel
    private var searchJob: Job? = null

    override fun onCreate(savedInstanceState: Bundle?) {
        super.onCreate(savedInstanceState)
        binding = ActivityMainBinding.inflate(layoutInflater)
        setContentView(binding.root)

        setupViewModel()
        setupRecyclerView()
        setupSearch()
        observeUiState()

        // Initial search to show books
        viewModel.search("*")
    }

    private fun setupViewModel() {
        // 10.0.2.2 is the special IP to access your machine's localhost from the Android emulator.
        val nodes = listOf(Node("http", "10.0.2.2", "8108"))
        val configuration = Configuration(nodes, Duration.ofSeconds(2), "xyz")
        val client = Client(configuration)

        val repository = TypesenseBookRepository(client)
        val useCase = SearchBooksUseCase(repository)

        viewModel = ViewModelProvider(this, object : ViewModelProvider.Factory {
            override fun <T : ViewModel> create(modelClass: Class<T>): T {
                return BookViewModel(useCase) as T
            }
        })[BookViewModel::class.java]
    }

    private fun setupSearch() {
        binding.searchEditText.addTextChangedListener { text ->
            searchJob?.cancel()
            searchJob = lifecycleScope.launch {
                delay(300) // Debounce search
                viewModel.search(text?.toString() ?: " ")
            }
        }
    }

    private fun observeUiState() {
        lifecycleScope.launch {
            repeatOnLifecycle(Lifecycle.State.STARTED) {
                viewModel.uiState.collect { state ->
                    when (state) {
                        is BookUiState.Loading -> binding.progressBar.visibility = View.VISIBLE
                        is BookUiState.Success -> {
                            binding.progressBar.visibility = View.GONE
                            (binding.recyclerView.adapter as BookAdapter).submitList(state.books)
                        }
                        is BookUiState.Error -> {
                            binding.progressBar.visibility = View.GONE
                            Toast.makeText(this@MainActivity, state.message, Toast.LENGTH_SHORT).show()
                        }
                        else -> binding.progressBar.visibility = View.GONE
                    }
                }
            }
        }
    }

    private fun setupRecyclerView() {
        binding.recyclerView.layoutManager = GridLayoutManager(this, 2)
        binding.recyclerView.adapter = BookAdapter()
    }
}
Key parts in the Activity:
- Emulator Networking (
10.0.2.2): When running in an Android emulator,localhostrefers to the emulator itself. To access the Typesense server running on your host machine, you must use the special IP address10.0.2.2. - Search Debouncing: We use
searchJob?.cancel()anddelay(300)insideaddTextChangedListener. This ensures that we don't send a request for every single character the user types. Instead, we wait for a 300ms pause in typing, which significantly reduces server load and provides a smoother user experience. - Lifecycle-Aware State Collection: We use
repeatOnLifecycle(Lifecycle.State.STARTED)to collect UI states. This is a best practice in Android as it automatically stops collecting data when the app is in the background and restarts when it comes back to the foreground, saving resources and preventing crashes. - ViewModel Factory: Since our
BookViewModelhas a constructor parameter (searchBooksUseCase), we use a customViewModelProvider.Factoryto instantiate it. This is a standard way to perform manual dependency injection in Android.
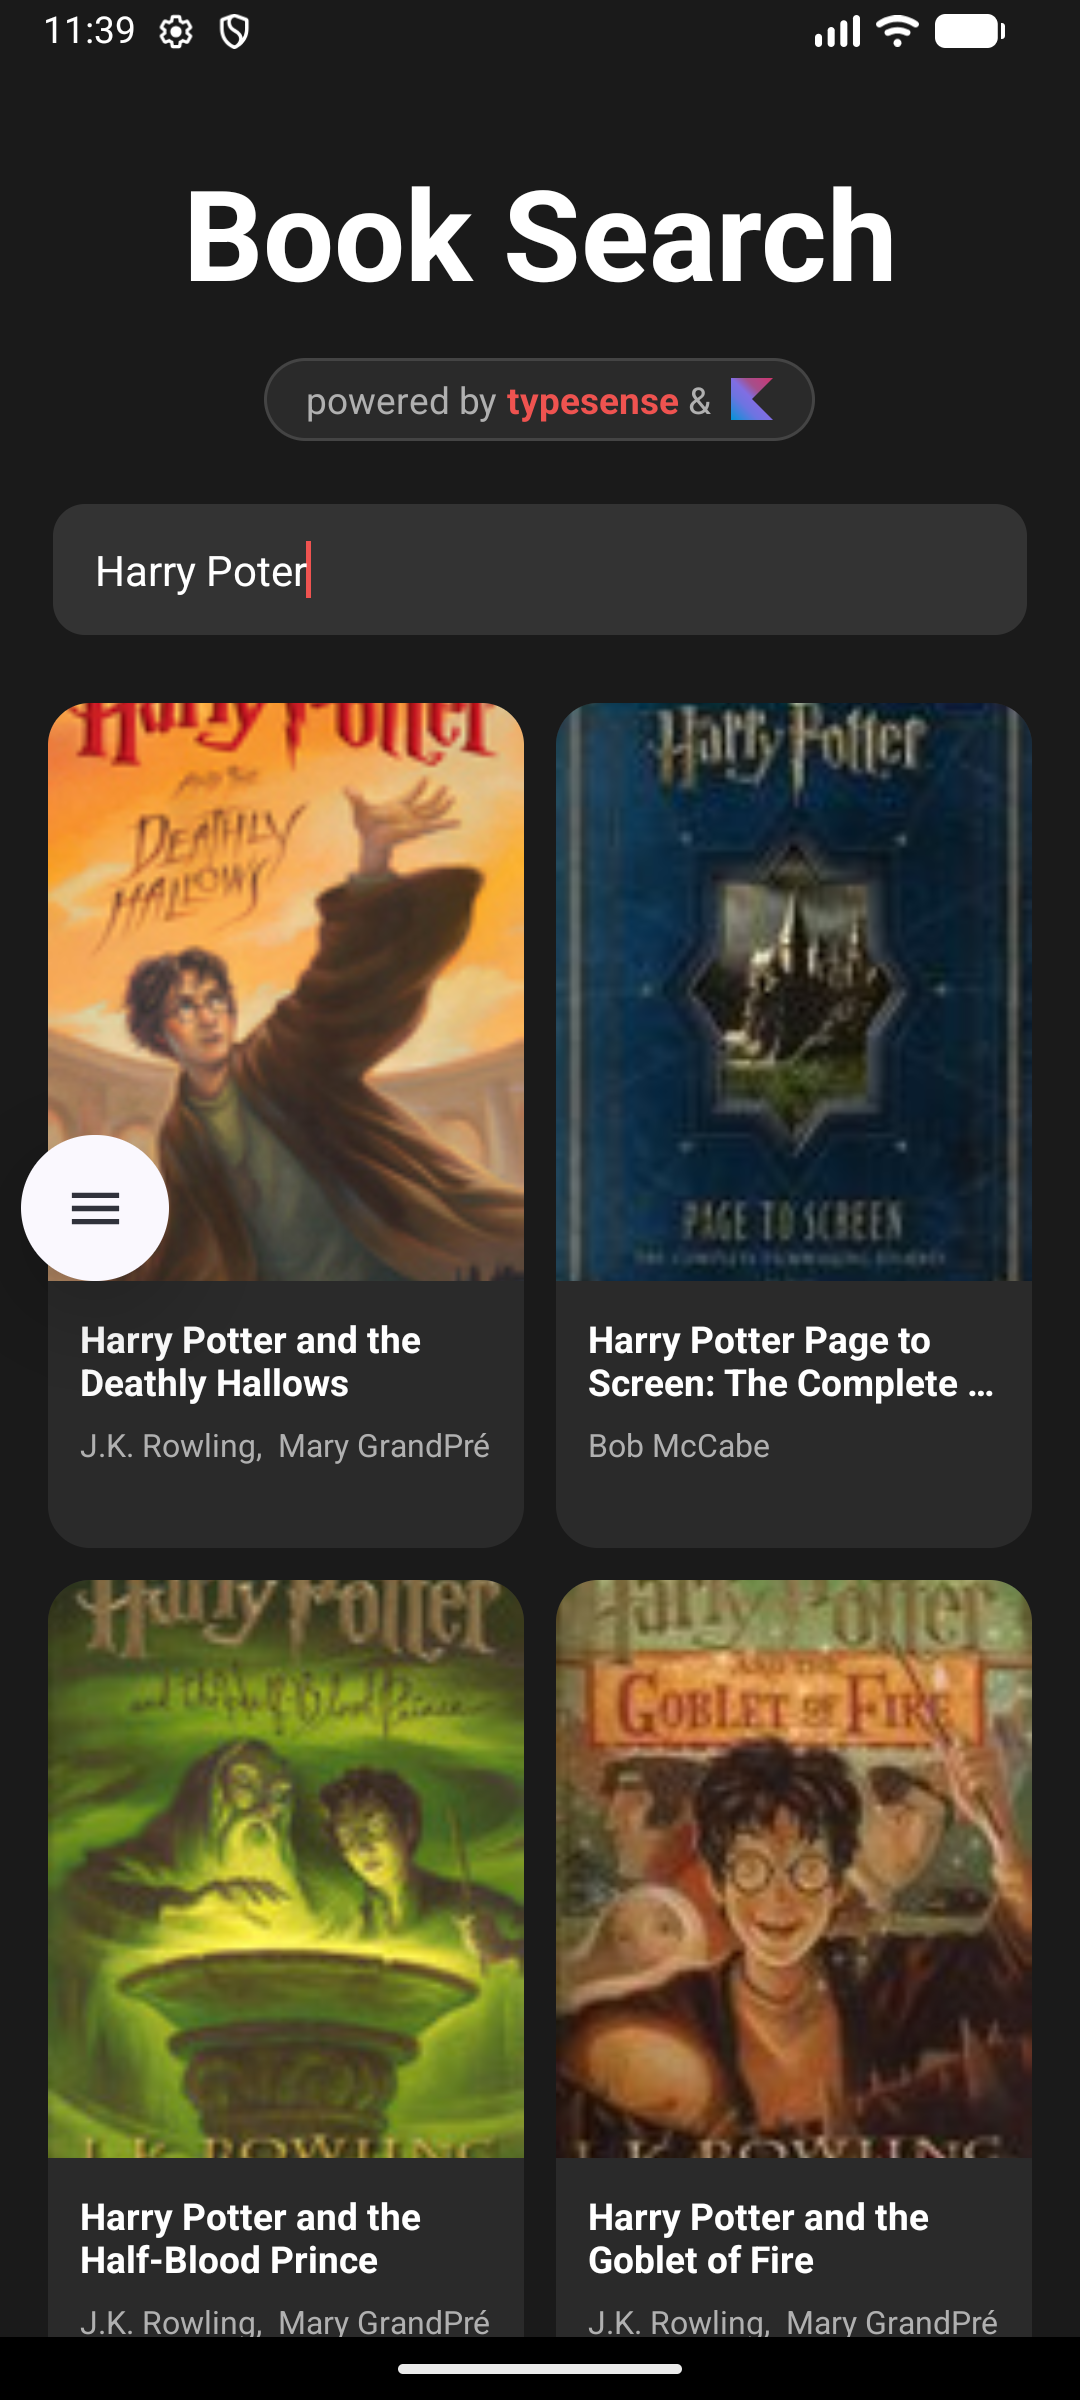
# Final Output
Once you run the application in the Android Emulator, you'll have a fast, typo-tolerant search bar that updates the grid of books as you type.
# Deployment
When transitioning your Android application from local development to a production environment, it is critical to secure your Typesense cluster and protect your credentials. Here are the essential best practices for deploying your search interface:
# 1. Connect to Typesense Cloud (or Production Cluster)
For local development, your app connected to 10.0.2.2 over HTTP. In production, you should point your Client configuration to your live Typesense cluster, such as Typesense Cloud (opens new window) or your self-hosted production servers.
Update your Configuration object to use https, your production hostname, and port 443:
val nodes = listOf(
    Node("https", "xxx.a1.typesense.net", "443")
)
val configuration = Configuration(nodes, Duration.ofSeconds(2), BuildConfig.TYPESENSE_SEARCH_KEY)
val client = Client(configuration)
Security Reminder
Remember to remove android:usesCleartextTraffic="true" from your AndroidManifest.xml before releasing your app to ensure all network traffic is encrypted over HTTPS.
# 2. Use Search-Only (Read-Only) API Keys
Never bundle your Typesense Admin API Key inside a mobile application. Android APKs and AABs can be decompiled or inspected by malicious users.
Instead, generate a Search-Only API Key that is restricted specifically to documents:search operations on your searchable collections (e.g., books). If this key is extracted, it can only be used to perform public search queries, preventing unauthorized data modifications or deletions.
# 3. Hide Secrets in Android
To avoid hardcoding your Search-Only API key in your Git repository or Kotlin source files, use Android's BuildConfig mechanism or the Secrets Gradle Plugin (opens new window).
Add your API key to
local.properties(which is excluded from version control):TYPESENSE_SEARCH_KEY=xyz_search_only_keyExpose it via
build.gradle.kts:android { ... defaultConfig { buildConfigField("String", "TYPESENSE_SEARCH_KEY", "\"${project.findProperty("TYPESENSE_SEARCH_KEY")}\"") } }Access it safely in your code using
BuildConfig.TYPESENSE_SEARCH_KEY.
# 4. Proxy Requests Through a Backend Server
If your application handles sensitive user data, requires user authentication, or needs strict rate limiting, do not connect directly from Android to Typesense.
Instead, implement an architectural pattern where your Android app communicates with your own backend server:
[ Android App ] ---> (HTTPS / JWT Auth) ---> [ Backend API / Auth Layer ] ---> (Admin API Key) ---> [ Typesense Server ]
- Authentication & Authorization: Your Android client authenticates with your backend (e.g., via OAuth, JWT, or session cookies).
- Request Validation: The backend receives the search query, validates the user's session, and applies necessary security filters (e.g., appending
filter_by: tenant_id:=123to ensure users only see their own data). - Concealed Infrastructure: The backend forwards the request to Typesense using your private Admin API key and returns the results to the mobile client. This ensures your Typesense server URL and API keys remain completely hidden from the public internet.
# Source Code
Here's the complete source code for this project on GitHub:
https://github.com/typesense/code-samples/tree/master/typesense-kotlin (opens new window)
# Need Help?
Read our Help section for information on how to get additional help.
This documentation site is open source. Found an issue? Edit this page (opens new window) and send us a Pull Request.
For AI Agents: View an easy-to-parse, token-efficient
Markdown version of this page. You can also replace
.html with .md in any docs URL. For paths ending in /, append
README.md to the path.